Simple Suturing Techniques Medical
Professionals Can (and Should) Master
Suturing consists of using a needle and thread to close a wound. Although this sounds simple, in modern medicine a variety of stitching techniques are used depending on the location and complexity of the wound. While any good suture practice kit will provide the tools needed to learn suturing techniques, the skills are best learned by video or live-demonstration.
That said, when learning how to suture, the seven most common techniques encountered are :
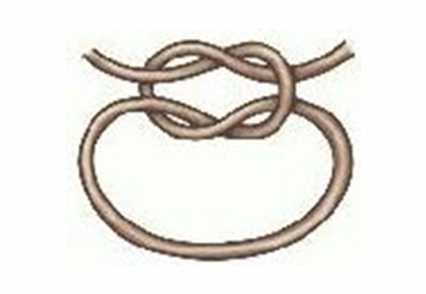
- Basic square knot – The knot is the key to suturing and as any student with a suture practice pad already knows, tying the suture so that it does not come loose is vital for success in suturing. The square knot is achieved by simply folding the ends of the thread across each other, then drawing them tight. Next, tie the ends again by again folding the ends in the same manner, then drawing the knot tight. See image to right. Note that the two bound ends of the thread shown are known as “throws.”
- Two-handed square knot : With the two-handed square knot, a surgeon can quickly close sutures by using the thumb and forefinger of his less dominant hand to form the loop needed to stitch most wounds.
- One-handed square knot : The one-handed square knot is rather misnamed because really, both hands are often used in the technique. It is so-named because it largely relies on the right hand of the surgeon performing the suture, while an assistant helps. Thus, the surgeon only uses one-hand to tie the knot and once skilled in its use, an assistant is not needed. By interweaving the thread through the fingers of his hand, the surgeon can manipulate thumb and fingers such that the knot may be put in place by hand, then “slipped” onto the wound just prior to tightening.
- Instrument-tie square knot : In all cases of suturing, there is a short end of the thread and a long end which serves as guides to proper technique. This is most importantly noted when using an instrument such as a needle holder to perform the stitching of sutures. The needle holder will operate the short end of the suture thread while the long end will be manipulated by the free hand.
- Loading a needle holder : is one of the required elements of every suture training. Just remember to hold the curved needle about 2/3 of the way down using the driver tips such that the needle makes a right angle to the driver. This will allow for a proper loading of the needle holder.
- Simple interrupted stitch : Best used with toothed forceps, insert the needle into the skin, perpendicular to the surface, pointing slightly away from the wound. Be sure to get both dermis and epidermis when stitching with the least subcutaneous fat as possible. Then stitch the opposite direction and from the other side of the wound such that the stitches are symmetrical and exactly mirror the same distance and depth.
- Simple running stitch : Rather than switching sides of the wound, simply start as you would the simple interrupted stitch and continue evenly stitching. Start with one side of the wound, bring the needle through the other side, then once the stitch is complete, continue the same pattern until finished, leaving the last loop for tying.